Hello,
We are block babies and have only approx 3 years of basic blocks coding skills.
At the present time we are stuck with our autonmous programming mode.
Using blocks and encoders we are able to drive to the designated location but having probleming incorporating the shooting code provided by Gobilda Starter bot (Auto code). We want to create a function to shoot the 3 balls. who is willing to help us crack this Code…
Can you show us what you’ve got so far?
Also, can you provide us with a step by step description of what you want the robot to do? Building that description is the best first step.
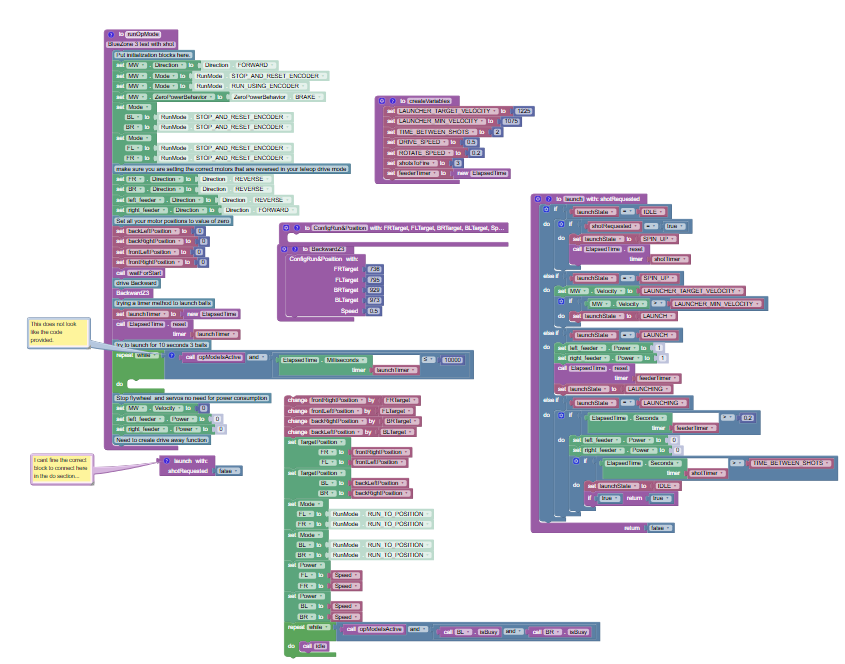
Ok here is our autonomous code for one of the 4 zones Team#22266 Automode for a zone 1 blue with encoders.Gobilda launch need to replicate this as a function without some of the code
Image 3 is GoBilda part of their launch starter code we are not using machine states currently above our skillset at the moment.
We need to start at the second set of blocks Else if statement launchstate = spinup on the launch section
then on the variables we need to remove get rid of the wheel diameter mm thru set track width inches, rotate angle, set drive tolerance, get rid of set red, set blue, set alliance
@ddiaz did you get a chance to see if we are on the correct path for this
Auto drive once it gets to the final location active the launch sequence using Gobilda coding starting at the second set of blocks.
Hey @egerena1,
Yes, I think I have a good handle on what you’re asking for. I’m not a big fan of the way goBILDA wrote their starterbot code, but I recognize that as programmers we all have our own “style.”
The first thing that I’m going to ask is that you modify your launch function in one very simple way. At the beginning of the launch function, there is an if statement that checks if launchstate = IDLE. The only thing inside that if block is another if statement that checks to see if shotRequested = true. That if shotRequested = true statement needs an else condition, and the only thing in that else condition should be the statement set launcher . power to 0. That way if someone passes “false” into the launch function the flywheel will stop spinning.
Okay, so now to your autonomous question. The launch function uses a state machine, and since all variables in blocks are global that allows us to peek into the state machine to see how it’s working - we can use that to know when the state machine thinks it has fired a ball. But we don’t want the state machine running amuck, so we want to put a time limit on the amount of time we’re going to give the robot to sit there firing balls. So here’s my shot (pun intended) at giving you an autonomous.
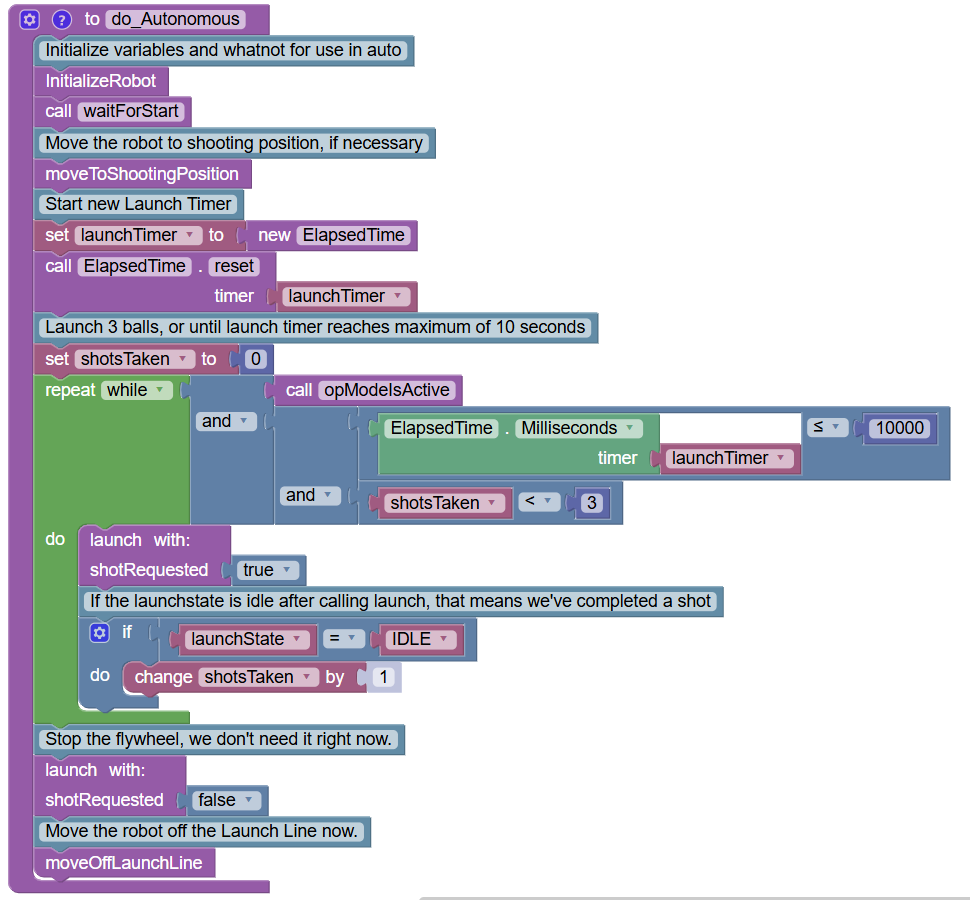
The functions moveToShootingPosition and moveOffLaunchLine are certainly up to the reader, you can figure that out I think. The function initializeRobot is effectively your createVariables, I just don’t typically call it that. But everything else I tried to faithfully replicate what you would do using your existing launch function (remember to modify your launch function as requested to stop the flywheel when you pass in false to shotRequested, otherwise you just have to stop the flywheel after the while loop.
Let me know if you have any questions.
Wow…
I am not a big fan of what they did also… That is why we like to write seperate code for each zone in Auto…
I like your logic, However, this is not in English… (LOL)…
BlockBabies with my students all newbies into programming…
The code I provided assumed you want the robot to attempt to “fire three times.” If you just want the robot to keep firing for a certain amount of time, we can make the code a little simpler, namely:
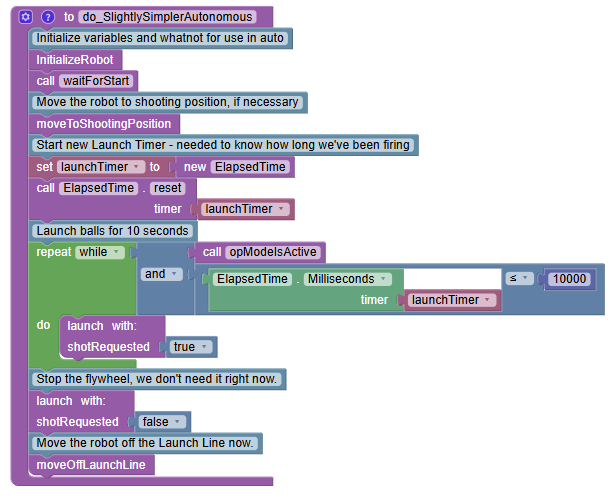
It’s important to note that this creates a launchTimer - basically it’s a count-up timer that we use. When we call ElapsedTime.reset, that resets the timer to zero, and then it starts counting up with the system clock. We then track how long the timer has been running (the current time on the clock) using the ElapsedTime.Milliseconds, and so we want to keep doing our “launch” action while it’s less than 10,000 ms, or 10 seconds.
Because the robot uses servos to feed the balls into the flywheel and needs to make sure the flywheel is spinning at the right speed, the code is a little more complex than perhaps it has to be. I see the Studica starter bot and the REV starter bot more for extreme beginners, and the goBILDA and AndyMark robots for mid-range teams looking for a decent place to start.
Again, I think all the starter bot vendors created great starter bots within the limitations they were given, so my hats off to them for doing it in a short timeframe. But, yes, different teams with different skills will possibly fully or partially understand the provided code.
-Danny
I am all for using the KISS method, Keep it Simple Simon less chance for errors and once they get to fully comprehend it the better then they can modify as they learn and I also learn with them.
I will show them this tomorrow at school during our morning meeting to our coder and see if she can work on it during her lunch time if she wants…
D. Diaz,
I hope you are having a great Friday I gave her the print out today and she worked on it and sent this to me she is stuck on it and said that it was like a scavenger hunt to find some of the blocks. She found some under Utilities and tried her best to replace what you recommended.
Whoa!
Sorry I didn’t see this reply sooner. Because the image is grainy I can barely make out what it says (did you have to reduce the size of the image?). I think I made out two parts:
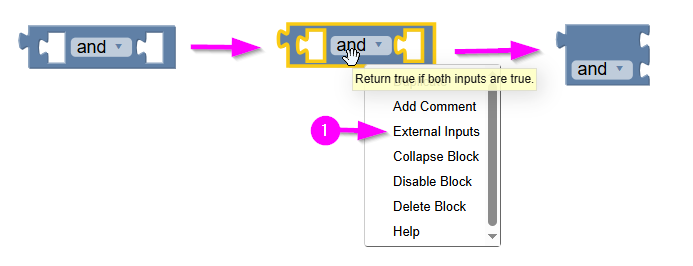
- Yes, the while loop block doesn’t look exactly like what I provided because the “AND” logic block in my example has “external inputs” turned on. Instead of having the AND block horizontally in-line like in your example, you can right-click on the AND block and choose “External Inputs”, that will horizontally stack inputs on the block and in most cases make it easier to read.
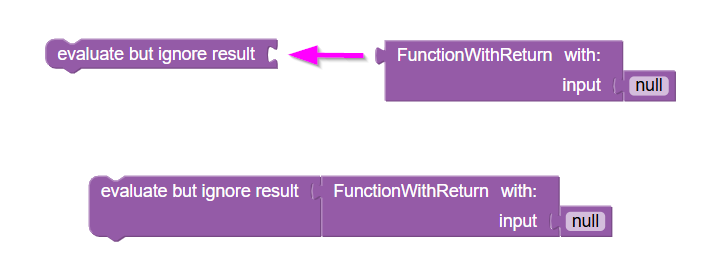
- Functions with return variables can be difficult to use, especially if you don’t actually need to use the return variables (or the return variable is useless). That’s why Blocks has a block called, “evaluate but ignore result”. You can tack that on the back-side of a block that has a return value and just ignore the return value. You can find the “evaluate but ignore result” in the “Miscellaneous” drawer at the bottom of the blocks menu.