Hey Richard,
I took a look at your models in your team’s account (I hope that was okay since you asked for help) - your labeling is clean, your object poses are varied, and your objects are fairly distinct. Congratulations, you’ve really nailed what most people have a difficult time getting a hang of. What you’re missing is what makes THIS year so different than LAST year. I will give you props, because you’re doing almost everything I did when training the default model this year. I stumbled in the EXACT place you’re stumbling, and it took me a couple days to figure it out. So Bravo, don’t feel bad, but let me explain.
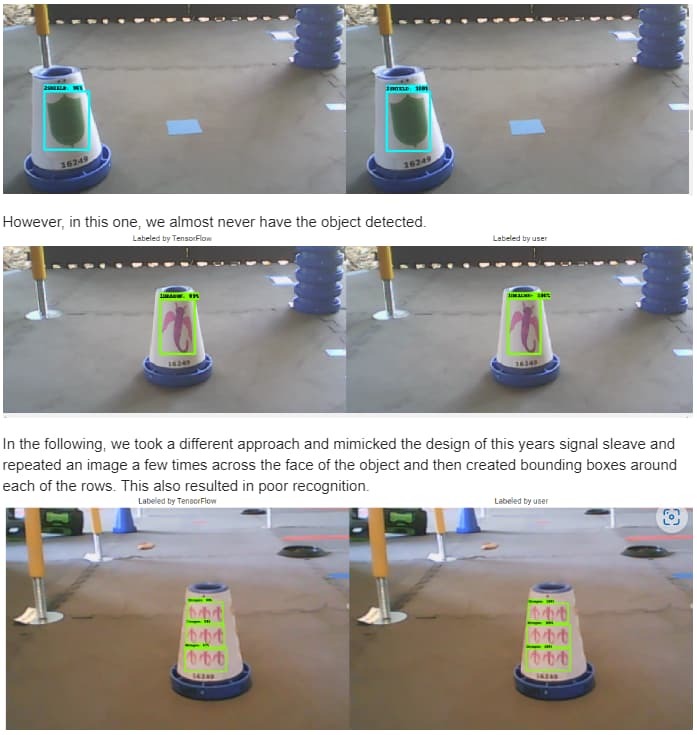
The crux of the problem is that we’re not detecting OBJECTS, we’re detecting PATTERNS ON OBJECTS with TensorFlow this year. Not a crazy difference, but how we approach the training MUST compensate for this. Last season we were detecting OBJECTS - like, for instance, if we were to train a model THIS YEAR to detect a RED CONE. The RED CONE is the object, and the rest of the “scene” is the background. If you remove the RED CONE, the background is what’s left in the image, and that’s your negative. With the negative, we can teach TensorFlow what is background and what is the object we’re trying to detect. Alternatively (or including) if the background changes enough times within the training data, TensorFlow will ultimately begin to ignore the background on its own WITHOUT employing a negative because TensorFlow eventually realizes that it cannot rely on the background as a way to identify the OBJECT (it says, “Oh, the thing I was keying off of isn’t there this time, so maybe I need to go back and find some other element to key off of for my object classification”).
Okay, now that we understand TensorFlow for a RED CONE, let’s switch our brains to thinking about TensorFlow with PATTERNS ON CONES. Okay, so what is the “PATTERN”? Well, that’s the image you’re trying to identify. That PATTERN is very different than the OBJECT we were trying to identify previously. TensorFlow doesn’t realize the PATTERN is an IMAGE that effectively has a TRANSPARENT BACKGROUND, and the white background color on the sleeve IS NOT actually supposed to be part of our image. That’s right, your BACKGROUND is actually the WHITE parts of the Signal Sleeve. If you were going to provide a real NEGATIVE for the PATTERN, you’d provide it with a scene where you have a Signal with a Signal Sleeve containing NO IMAGES on it - you would NOT remove the signal!
But that’s not the worse part of it yet. The worse part is that your background color is WHITE. I’m sorry, what you’re seeing here are effects that professional photographers and videographers must account for with WHITE BALANCE. See, the problem is that in different lighting conditions, WHITE takes on different colors - it may take on a blue shade, it may take on an orange tint, it may take on a light brown. This is the bane of photographers everywhere. And what’s worse, is TensorFlow gets confused by it too. If you notice, in almost all images where you use the green-ish “shields” on your video your white signal sleeve takes on a blue-ish tint. Almost everywhere you use the purple dragon, your white signal sleeve takes on a warmer color and appears with a orange-ish tint. TensorFlow looks at the bounding box and says, “Wow, in all these ‘objects within my bounding box’ where a ‘shield’ is present there’s this nice blue-ish background, so that must be part of the ‘object’. I always see this blue-ish background, so if the background isn’t blue-ish it must not be a ‘shield’”. And so on for other images. This bit the heck out of me, too.
What I had to do is reproduce several different lighting conditions, and get short videos of all my images in those lighting conditions. What that did was trained the model to not rely on the background color, and to find something else - namely the image I provided, or patterns of those images. You have to treat TensorFlow like a child sometimes. I documented this for teams in ftc-docs “TensorFlow for PowerPlay”, look especially closely at the section marked “Understanding Backgrounds for Signal Sleeves” for more info.
If you have more questions or need further clarification, let me know. My models looked and trained just like yours - okay maybe mine had slightly better training metrics and detections within the evaluation data, but it was absolutely garbage once it hit “real life.” However, once I trained TensorFlow to stop paying attention to the background my results got better instantly. Just FYI, providing a “blank” sticker/sleeve (without the actual images on it) didn’t hit me when I did my training, but it may possibly save you from having to do lots of different lighting scenarios.
-Danny
